Another manipulation I tried was to fold the fabric into as small a square as I could, then slip small coins between all the folds. I wasn't sure that this would be very effective as the coins did not line up. The whole bundle was secured as tightly as possible.
The results are subtle but really interesting. The top piece shows the lines of the tape on one side of the fabric. The effect on the reverse is very subtle. For a clearer effect I assume you would need to tape both sides of the fabric.
The effect from the coins was also subtle, but I think beautiful The white spots are probably where the coins did actually line up to make an effective dye barrier. I also love the way the dye has split. Both these pieces were dyed with the same colours, golden yellow and boysenberry.
I also dyed the bottom two pieces of fabric in the same cup, pouring in yellow first and leaving it for a short while to give it time to take before adding light red.
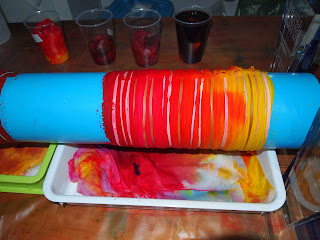
I have come to the conclusion that the best fun a girl can have with her clothes on (and that doesn't involve peanuts, car parks or rubber ducks), is pole dyeing! The end product is just so beautiful. I now have a pole of a larger diameter, which allows me to dye larger pieces of fabric, or as seen below, two pieces at once.
With this round of pole dancing I painted the dye onto dry fabric (the piece on the left). First I randomly painted a few areas lightly with golden yellow and gave it a few minutes to absorb. Next I painted the whole thing with a golden yellow and boysenberry mix.
This is the resulting piece. The initial golden yellow application is subtle but visible. The end of the fabric is ragged because having managed to get so far into getting it on the tube, I ran out of elastic bands big enough and had to hack off the excess fabric!
For the second piece on the pole, I soaked the lemon yellow end in water for a while to ensure it was good and wet and then wet the rest of the fabric. Using a strong lemon yellow mix, I painted it over approximately 2/3s of the fabric, making sure that some areas were really soaked with the dye and that I didn't have too much of a straight edge. I left this for some minutes to absorb before starting at the other end with light red, which I applied heavily at the beginning and lighter as it reached the yellow. Being the scrooge that I am, I placed fabric in the bottom of the trays to collect the excess dye.
You can see the fabulous fabric that this manipulation made.
The fabric has so much texture, what great fun this manipulation is!
The left piece again looks like rolled fabric, the middle her 'nipples' (not Sue's you understand, because if they really are that colour, she clearly has been splashing that dye around too much!), the far right is folded squares (how terrible if I named everything wrong!).
Sue said these pieces are much brighter than in the photo. I believe she has over dyed some lemon yellow fabric.
It is really gratifying to see both Iris' and Sue's work and to know that they too have been excited by the possibilities of dyeing.
Okay I haven't finished with those poles yet!


Great effects with your dyeing process. With the possibilities seeming endless, it's a perfect way create an amazing stash!
ReplyDeleteI'm off to Home Depot for more tubing. One day. jt