A book is available, called Confetti Naturescapes. Just click to link to Dragon Threads (great name), who publish the book. I bought it and had it signed - what a groupie! It is mostly pictures and information about her quilts, rather than a how to book. The actual process of making the quilts, is on about 12 pages.
The question about using glue instead of netting or tulle was almost my first thought, until I understood the process.
You can't glue the fabric to be stuck down, as you are talking about very small pieces. Obviously you can't glue prior to cutting or you would just be left with a gummy mess and a ruined rotary cutter blade.
If you glued the base fabric, you would only be able to get on one layer of confetti. Remember, you are kind of dropping lots of little bits onto an area, rather like when you scatter a pinch of salt.
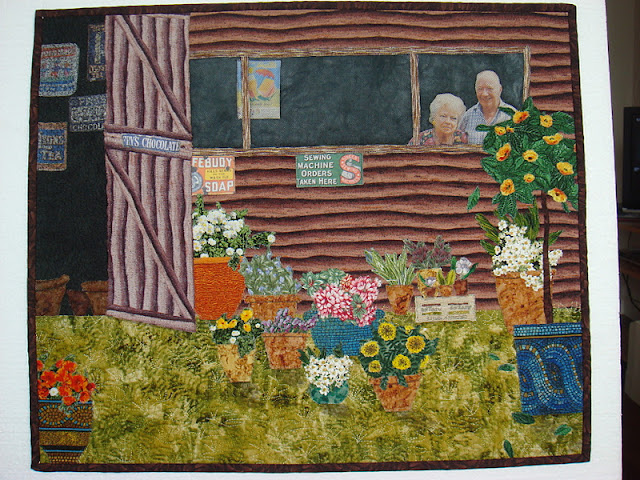
I have used the glue method on many of my quilts. Below is an example.
 |
| Roy & Norma's anniversary quilt |
This quilt was made for the 50th wedding anniversary of my Uncle Roy and Aunt Norma. It shows their garden, which Norma constantly works in and loves, and Roy's workshop, where he spends a lot of his time. The workshop is decorated with some tin signs, which he collects.
The sewing machine sign, was to tie my interests in with theirs.
This is an example of using netting or tulle, not to hold things in place, but to grey them out and to give the illusion that they are nehind glass. Had I used a more opaque fabric, they would have been less visible.
All the bits on this quilt, were first glued using a regular glue stick to hold them in place. After the elements were in place, I decided that the signs and flowerpots in the interior of the workshop were too bright. I added two layers of black netting, to really dull it out and to get a feeling of distance.I don't know how other people manage with glue, but it can be a bugger to sew as it gums up the needle and catches the thread as it passes through the needle, just enough to shred it, when free motion stitching. It takes a lot of patience and time to do this, as I have learned many times. I also think the climate here makes the glue more tacky, which doesn't help.
 I did use glue with the figures on the Woodland Walk, just a dab, to hold them in place so I could sew them down, as by the time I got around to them, you needed fingers like wood, to push pins through the quilt!
 I also used spray glue (like you use for mounting art work) to add the netting to the figures, but only after working out that it was better to lay the netting onto absorbent tissue first, spay it very lightly and leave it to dry. Then apply the netting to the figures. I could have just left them without the netting, but the small figure needed to be greyed more to give the illusion of distance, and the near figure just felt too bright to me.
There is also a technique used by Cindy Walter, called Snippet Sensation. Cindi takes a piece of fabric and cuts it into snippets with scissors, directly onto the fabric.
She uses steam-a-seam, Bondaweb or other similar iron on products on the fabric that is to be cut into small snippets. If you do not know these products, they are a thin sheet with glue on both sides. Heating with an iron activates the glue.
 |
| Sunset |


No comments:
Post a Comment