
 Like most quilters I know, I use only two or three of the stitches from the many that are available on my sewing machine. The quilter Carol Ann Waugh however, uses every single stitch on her machine. And I mean every stitch. Carol has produced some interesting looking quilts, so I signed up for her class Stupendous Stitching on Craftsy and gave it a go.
In order to learn what all the stitches on my machine really looked like, and to see what happened when I played around with length and width, I had to make a stitch bible. Boy, I would rather stick needles in my eye than do that again! I found it a really boring exercise, though it produced a useful reference for this and other projects.
I stitched each and every stitch for a few inches, then changed the length of it and stitched a few more inches. Next I altered the width and sewed again. Part way through, you could tell my heart wasn't in it as my stitches started going on a bit of a slant. But then the old ethos kicked in, well sort of, and I got back on track. I ended up with 8 pages like the one above. I gave up on the idea of seeing what I could get from the Elna, enough of my life had already passed in front of my eyes. Yeah yeah, if you are feeling like that now, you shouldn't read this then!
Each page had been backed with iron-on interfacing when sewn, and was then backed onto the next page with Steam-a-Seam (or a similar product). Lastly it was edged with rat-tail cord binding. I have yet to get some grommets to turn all the loose pages into a book.
Onto the real stuff!

Taking a selection of different cords and not trying to colour coordinate, they were couched down. If I'd had a large couching foot it would have been a lot easier and smoother. I just went with my satin stitch foot (which has a grove under it) and stitched really slowly. In retrospect, I think I could have put in another line or two of the couching.
 Next all those hours of stitching the stitch bible were utilised as I scoured it, looking for interesting decorative stitches, and how I wanted them to look. Ideally there should have been a line of stitching next to every couched down line. I managed to get several lines in. This wasn't a problem, it was just that the couching took less time! Again, I started to find it a bit boring as all I did was follow the line of the couching.
Between all the lines, a gap was left for further stitching later. Finally, most of the fabric was covered with lines (or sections) of stitching. Larger gaps were left for some hand embroidery.

Never having been a hand embroiderer I careful watched this segment of the class. Straight away I realised that I didn't have the right sewing needles. I managed to find some tapestry needles in my collection, that had sharpish rather than bullet shaped points. I used these along with a thimble, but my fingers were still sore from trying to get them and the thread through the fabric and stiffening. I think it would have been a bit easier had I used proper interfacing.
I went online to look up some embroidery stitches, but realised that most were going to be too hard for me to execute, given the above problem, so I stuck with stab stitch, an open chain stitch and French knots (the first time I ever managed to make them, so I was quite pleased with that). This was all worked with the fabric in a frame. I used a lot of variegated thread.
 After that stage was completed, I moved in a slightly different way from Carol. She was making her project as a picture, where as I wanted a quilt. I backed mine as per usual, but used spray baste rather than hand basting. Carol used fusible fleece and fusible sheets to adhere her quilt sandwich. I'm not mad on lots of fusible stuff, but I guess for a picture that is going to be glued to a mount, it was okay.
Whether making the quilt or the picture, the whole thing needed quilting, to hold the sandwich in place. The reason you need to quilt the picture, is to give it more dimension. If you look at this photo, the right is quilted and the left not. See the difference? It looked good before the quilting, but it looked a lot better after.
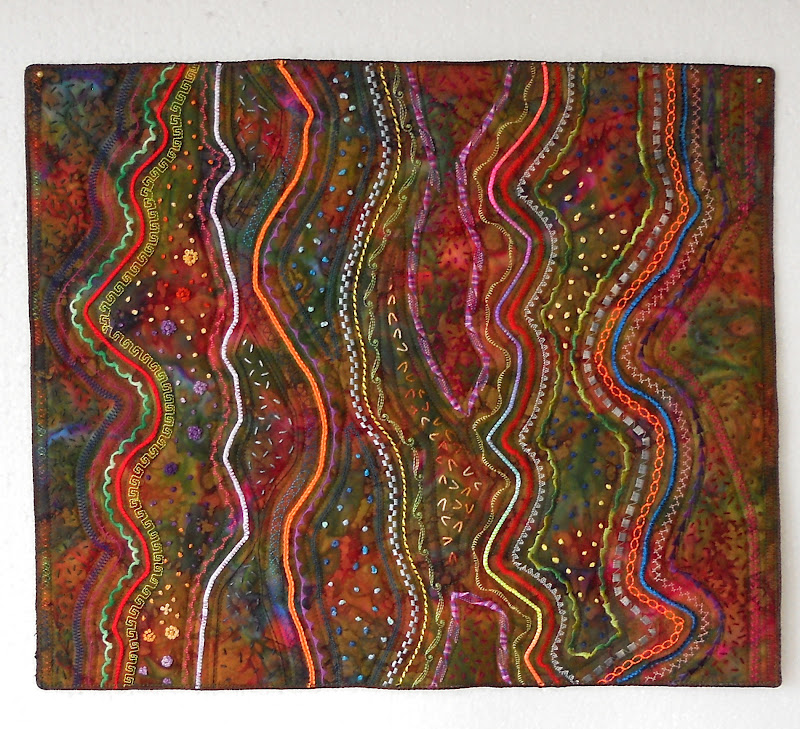 This is the finished quilt. First of all, if you compare it to the second picture above this, you will see that I unpicked a lot of those bright yellow French knots that ran in a long line down the right. This is a big no-no in Carol's philosophy, she says there are no mistakes. Well crap to that! That is just making an excuse for sloppy in my book. If it doesn't look right, fix it. I just didn't like the idea that everything you added to the surface of the work should stand in bright contrast to the background. Carol felt that your eye didn't need a place to rest, well mine certainly did. I made sure that there were different levels of contrast to draw you into the quilt. The areas on the extreme right and left and where those French knots had been, look empty; but they are filled with embroidery, you just have to walk in closer to see them.
 So I'm a rebel, so sue me!
 Carol doesn't bind her quilts in the traditional way, instead she uses rat-tail cord, zigzagged to the edge of the quilt. When you watch her do it, she zips along at the speed of light. I crept along desperately trying to keep the cord aligned and not going under the quilt. I was not hugely successful! I think you need to practice this a lot before attempting this with anything you deem precious. If you click on the picture, you can see the binding. Also on view here are my French knots, which I made into little flowers, just a bit of fun.
So, in the final analysis, what did I think of Stupendous Stitching?
First off, I found it boring. I guess using all those regular stitches, no free motion, sewing a line up, sewing a line down. It just didn't excite me. I have thought of a way to adapt the idea to something that I would find more interesting, so I may give it another shot.
Another thing is that close up, I don't particularly like the look of this quilt, it is after all, just lines of automated stitches. However, I do like the effect when viewed from afar (or without glasses), and which is why I think the idea of having differing levels of contrast works better. The individual stitch patterns are not so obvious and makes you want to look closer.
It is just too much! There is so much going on. Each thread is different, as is every stitch. That is simply not my style. I need a more co-ordinated way of working. Her approach is quite anarchic. Just pick something and throw it on there and DON"T colour match. Well I had to pay some attention to colour, though I really tried my best not to. Anarchy rules, but just not here!
I think if you have some spare time then forget the stitch bible and just give this a go. You can pick different stitches as you sew. Carol recommended working on a fat quarter first, which I think is a good idea. Don't go mad like I did and buy masses of cords etc. Work out your background fabric first, then buy a few yards or cords. Better yet, as she advises, raid your knitting drawer for some wool, get a bit of ribbon, you could even use string. If it can be couched down, it can be used. If like me you have masses of threads, great. She advises using a different thread for every stitch, which I did.

I've come up with WANGA WANGA. I think I have made up but someone let me know if I haven't, or if it means anything rude!
Don't know about any aboriginal meaning but the urban dictionary has it as slang for penis!
ReplyDeleteYes it does have that look. Amazingly colourful. Love the hand stitching flowers. Need to ask you a lot - I looked up couching - am currently quilting dress bodice to cover up shabby joining of 2 dresses together with my machine's 3 lengths of straight stitch & 3 zigzag. I thought I wouldn't like machine embroidery - have done hand embroidery before - but there are some nice ones. I will email u later re sewing machines as you have inspired me to think more about getting better one - looks like u can use all kinds of thread - I haven't tried out how far my little machine can go with diff thread thickness but going to now.
I love the emb bible - like artist sketchbook with colour wheel and brush stroke experiments. Would do this if get new machine and would love to do hand one too.
OMG! I am rolling up laughing, my penis quilt! I think I had better change the name. It took me until this morning for the lightbulb to go off, of course a wanga is a penis. What was I thinking? Well, I guess we know exactly what I was thinking!!!
ReplyDeleteI LOVE your critique. Thanks for keeping me focused on what works for various people. I agree. The stitch bible is numbingly boring. I needed many glasses of wine to keep working on it. But use it every day. I know you don't care, but I also think your piece is wonderful, your contrasting colors really make the surface exciting. You rock!
ReplyDeleteHa ha, who did I NOT expect to see on my blog!!!
ReplyDeleteMaybe you should have put the bit about drinking wine in your video, that would have helped me. I agree that the stitch bible is useful once you have it, as I have referred to it a few times since making it, but I just couldn't do it again. Maybe I need to just pay someone to do it for me next time I need one. Or maybe I need to drink the WHOLE bottle of wine!
Thanks for stopping by.